Hiring a professional wholesale fashion jewelry photographer can be great for your business. But it may not always be the option for you to take. Starting a business can be costly, and at this initial stage you’d surely want to save as much as you can on expenses so that you’ll have enough funds to use while your business start-up is just taking off the ground.
With these seemingly high goals for wholesale jewelry photos, the million dollar question remains – how could you get great photos of your products without breaking the budget?
In our previous post Taking Photographs of Wholesale Fashion Jewelry,we’ve shared with you simple tips on how to snap professional-looking photos of your jewelries even if you are an amateur. Here’s a quick run down of the fashion jewelry photography tips that we had for you.
- Set up your camera to spot focus
- Soft and continuous lighting best highlights your pieces
- Wax stands are great tools to position wholesale necklaces, pendants and earrings
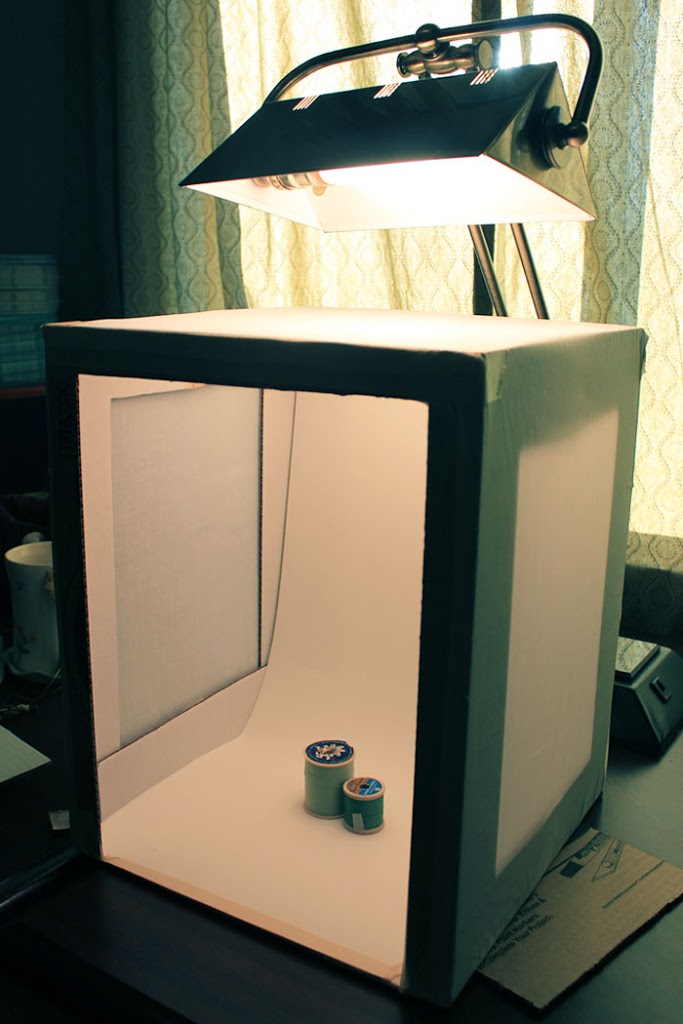
Today, we’ll show you how to build your own light box to create more savings as you get better looking and more appealing photos.
Materials Needed
- 2 Tri-fold display boards (a cardboard box is a suitable substitute)
- White poster board
- Masking tape
- A white muslin fabric
- Ruler
- Exacto knife
- Cutting mat (newspapers would do)
- Glue
- Scissors
- A light source with a natural light bulb (to be used when taking photos, not added to the box)
Procedure
1. Line your working area with a cutting mat or newspapers
2. Taking the tri-fold board that you’d like to use as the rear part of the photo box, draw a 2-inch square border on it and cut it out afterwards. (Set aside the center cut-out to be used later)
3. For the front board of the light box, draw a 1-inch border and remove the bottom part to create a 3-sided square. This will allow flexible angle shooting once done.
4. Attach the two boards to create a box.
5. Take the center pieces of cardboard you’ve cut out and make them the bottom flooring of the box. Secure this attachment to the sides of the box with masking tape.
6. Use a ruler and an exacto knife to straighten out uneven cutting
7. Cut a white poster board that fits inside the box. Make sure that it connects the top of the box’s rear boarder to the bottom of the removed boarder in front. This creates a curve if done correctly.
8. Cover the sides and the back with a muslin fabric. Attach it well to the box frame with an ample amount of masking tape.
Tutorial inspired by Ninth and Bird


